wordpress添加高级搜索的简单方法
我们都知道,wordpress的搜索功能并不强大,但是时至今日也没有看到wordpress在搜索上的改进,如提供分类搜索,标签搜索,自定义文章类型等这些有用的选项。因为每次搜索都要全部搜索一下,实在是没有必要。那么有没有办法实现这样的自定义的高级搜索呢?方法是有的。笔者在开发一个wordpress主题时曾用代码实现了这个功能。今天我要介绍一个更加简单的方法。那就是使用插件来实现。这款wordpress插件叫Facetious。
一、Facetious插件介绍
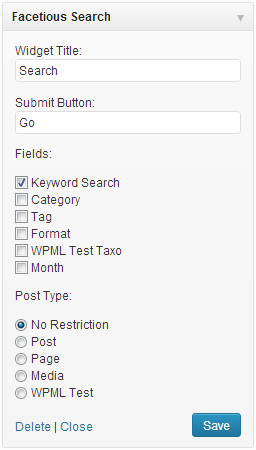
Facetious允许我们直观的添加一个高级搜索功能,并且使用侧边栏来展示wordpress搜索框 ,其功能包括:
- 分类 (标签, 分类目录和自定义文章分类)
- 按月
- 搜索输入盒
并且可以限制文章类型。
我们可以看到简单的选项,依次为小工具标题,搜索按钮文本,显示字段,文章类型设置等。
二、如何使用Facetious添加wordpress高级搜索功能
首先你需要下载Facetious,通过官方地址http://wordpress.org/plugins/facetious/或使用wordpress后台插件直接搜索安装。安装之后激活,把它放在侧边栏小工具区上即可显示wordpress高级搜索功能。这里需要说明一下:这个侧边栏小工具不一定就是在左边或右边,你完全可以把其自定义在任何一个位置。
那么如何把高级搜索功能放在wordpress主题模板呢呢?
Facetious提供了一个语法,如下:
do_action( ‘facetious’, $args );
‘$args’是数组变量:
submit-字节变量,提交按钮文本。echo– 布尔 – 是否表单输出。class– 字节 – 表单名类。id– 字节 – 表单ID属性。fields– 数组 – 显示字段列表。
下面是示例:
[php]
<pre><code>do_action( ‘facetious’, array(
‘submit’ => ‘搜索’,
‘fields’ => array(
‘s’,
‘custom_tax_1’ => array(
‘label’ => ‘选择选项’,
‘class’ => ‘my_tax_class’,
‘id’ => ‘my_tax_id’,
‘all’ => ‘All terms’
)
‘custom_tax_2’,
‘m’
)
) );</code></pre>
[/php]
三、Facetious前台外观展示
垂直展示:
这是默认展示。
水平展示:
这个展示需要重新定义css,你可以把下面的代码放大你的主题样式里:
[php]</p>
<div>#facetious_form {</div>
<div>background:#f4f4f4;</div>
<div>padding:10px;</div>
<div>border:1px solid #ccc;</div>
<div>margin-bottom:1em;</div>
<div>overflow:auto;</div>
<div>}</div>
<div></div>
<div>#facetious_form select {</div>
<div>width:auto;</div>
<div>}</div>
<div></div>
<div>#facetious_form select,</div>
<div>#facetious_form input {</div>
<div>font-size:1em;</div>
<div>}</div>
<div></div>
<div>#facetious_form p {</div>
<div>float:left;</div>
<div>margin:0 5px 0 0;</div>
<div>}</div>
<div></div>
<div>#facetious_form .facetious_submit {</div>
<div>float: right;</div>
<div>margin-top: 2em;</div>
<div>}</div>
<div></div>
<div>.facetious_submit_button {</div>
<div>background-color:#981e32;</div>
<div>background-repeat:repeat-x;</div>
<div>filter:progid:DXImageTransform.Microsoft.gradient(startColorstr="#c32640",endColorstr="#6e1524");</div>
<div>background-image:-khtml-gradient(linear,left top,left bottom,from(#c32640),to(#6e1524));</div>
<div>background-image:-moz-linear-gradient(top,#c32640,#6e1524);</div>
<div>background-image:-ms-linear-gradient(top,#c32640,#6e1524);</div>
<div>background-image:-webkit-gradient(linear,left top,left bottom,color-stop(0%,#c32640),color-stop(100%,#6e1524));</div>
<div>background-image:-webkit-linear-gradient(top,#c32640,#6e1524);</div>
<div>background-image:-o-linear-gradient(top,#c32640,#6e1524);</div>
<div>background-image:linear-gradient(#c32640,#6e1524);</div>
<div>border-color:#6e1524 #6e1524 #981e32;</div>
<div>color:#fff!important;</div>
<div>text-shadow:0 -1px 0 rgba(0,0,0,0.33);</div>
<div>-webkit-font-smoothing:antialiased;</div>
<div>padding:2px 5px;</div>
<div>}</div>
<div></div>
<div>.facetious_submit_button:hover {</div>
<div>background-position:0 0;</div>
<div>background-color:#701;</div>
<div>background-repeat:repeat-x;</div>
<div>filter:progid:DXImageTransform.Microsoft.gradient(startColorstr="#ad001a",endColorstr="#47000a");</div>
<div>background-image:-khtml-gradient(linear,left top,left bottom,from(#ad001a),to(#47000a));</div>
<div>background-image:-moz-linear-gradient(top,#ad001a,#47000a);</div>
<div>background-image:-ms-linear-gradient(top,#ad001a,#47000a);</div>
<div>background-image:-webkit-gradient(linear,left top,left bottom,color-stop(0%,#ad001a),color-stop(100%,#47000a));</div>
<div>background-image:-webkit-linear-gradient(top,#ad001a,#47000a);</div>
<div>background-image:-o-linear-gradient(top,#ad001a,#47000a);</div>
<div>background-image:linear-gradient(#ad001a,#47000a);</div>
<div>border-color:#47000a #47000a #701;</div>
<div>}</div>
<p style="text-align: left;">[/php]


